Thursday, May 27, 2010

My Story


Growing up, I heard the phrase, "You are what you eat." I never gave it much thought, though. I probably would have just avoided Dum Dums, Ding Dongs, and suckers, and stuck to Smarties and Angel Food cakes instead, all while hoping to meet a Big Hunk someday. (I did, by the way. I even married him.)

It wasn't until my health crashed in my early thirties that I realized how true the statement was. I had eaten a lot of junk, and that is exactly how I felt. I was tired and grouchy all the time, I had a lot of the symptoms of diabetes, and I had a yellow/orange hue to my skin that had me looking like a tanning lotion application gone wrong.

Eventually, I found that I had hypothyroidism, anemia, blood sugar stabilization problems, hormone imbalances, and gluten, starch, and other food intolerances. At first, I felt very sorry for myself and cried a lot. In fact, I thought I was pregnant because I cried so much, even at the end of Mulan when her dad said she had honored him by saving China. (Sorry to those of you who haven't seen the end and I just blew it.) But I wasn't pregnant, and there would be no joy of holding a new little one in my arms after months of pregnant-like symptoms.

Then I decided to take action. I was going to feel better even if it killed me, and I knew that improving my diet was the first place to start. I delved into understanding how people have eaten for generations on this planet, a time before food was refined and processed, a time where civilizations lived completely off the land, and a time before diseases like hypothyroidism, cancer, diabetes, heart disease, autoimmune disease, and obesity existed. I discovered that our ancient ancestors were remarkably healthy, living for years longer than we do now, and didn't have these diseases. What they ate and how they prepared it determined their health, and I could apply this knowledge to my own cooking.

So I started having fun making healthy, whole foods based on these principles and found that my body could easily digest and assimilate them, even gluten containing foods because I applied the lost preparation techniques. I wasn't surprised that my health improved, but I was surprised that cooking this way made the food taste so awesome.

I couldn't keep these secrets to myself, so I began sharing my creations. The next thing I knew, I was teaching classes about true nutrition, selling my desserts, making a tasty berry cream pie on live TV, catering, and writing and compiling this cookbook with the culinary talents of Michelle Stewart, whose own health story, beliefs, and cooking experiences are quite similar to mine.

The Diet Rebel's Cookbook is made of more than 300 delicious recipes based on the forgotten food preparation techniques. Not only do the recipes taste wonderful, but they are easier to digest, help stabilize blood sugars, teach how to eat wheat when gluten intolerant, and how to properly use grains, beans, and nuts so you can increase nutrients and decrease gas. But most of all, you really are what you eat, and using this cookbook can make it wonderful.

To peek inside this book, click here.

Saturday, April 17, 2010

Sourdough Pancake Recipe


From Souring under Sprouting for Dummies and Smarties in The Diet Rebel's Cookbook Eating Clean and Green by Jillayne Clements and Michelle Stewart


"Another way to prepare grains without sprouting but still increase nutrients, digest gluten, and knock out phytic acid is to soak and sour. In this case, non-sprouted, freshly ground whole-wheat flour can be used by mixing and soaking it overnight with a little lemon, liquid whey, or raw apple cider vinegar and water.79 This is great for pancakes and a lot of other bread recipes, including our sourdough recipes. The cool thing about sourdough is that it doesn’t taste sour if you add a little baking soda to the batter. Plus you get the added bonus of conducting scientific experiments by adding soda (a base) to the acidic soured dough, and watching the two have a chemical reaction. This makes the bread or batter rise and fluff. Many of our recipes use the soured-plus-soda technique or use soda in place of yeast for yeast-free breads. When souring, just remember not to soak and sour already sprouted and dehydrated flour, because soaking and souring also digests gluten, and then you’ll digest so much gluten that you’ll end up flipping solitary crumbs on a griddle instead of pancakes."

Sourdough Pancakes

4 cups freshly ground whole wheat flour
4 cups filtered water or sour milk (raw)
1 tsp souring agent: lemon juice, raw apple cider vinegar, or whey with live cultures(Omit souring agent if using sour milk)
2 eggs
1 tsp sea salt
2 tsp baking soda

Directions:

Stir together in a glass bowl, the wheat flour and water, souring agent, or sour milk. Cover with a damp cloth and place on the counter for 12-24 hours. (24 hours is best, but any longer than 24 hours and it begins to turn to alcohol.) After 12-24 hours, the dough should have a sour smell and be bubbly. Beat eggs and mix into the sourdough, (if dough is too thick for preference, more water may be added,)then stir in sea salt and baking soda. Dough should fluff up. Pour onto a buttered griddle. Top with maple syrup (the kind that comes from an actual tree) or applesauce.

Note: whenever using a sourdough recipe, always start off with flour that hasn’t been sprouted first or the combined effect of sprouting and then souring, both of which digest gluten, will cause nothing but crumbs.

Thursday, April 8, 2010

The Diet Rebel's Cookbook: Back Cover Blurb, Contents, and Introduction


Back cover blurb:

"Jillayne Clements and Michelle Stewart bring new meaning to the phrase, "You are what you eat" in The Diet Rebel's Cookbook: Eating Clean and Green. Don't let processed, refined foods that have been stripped of their nutrients be the primary fuel for your life. Give your body what it naturally needs.

The Diet Rebel's Cookbook reveals the benefits of eating whole, natural foods as a regular part of your diet and includes traditional recipes and time-tested preparation tips that will help your body get the most out of what you eat. Learn how to use whole grains, natural sweeteners, fresh produce, and healthy meats on a daily basis, and you will impress your friends and family with recipes that are both delicious and healthy.

You can't truly become healthy by following trendy diets that come and go from year to year. Go back to the basics, and you will discover what eating is all about! This cookbook will soon have your family eating right, feeling good, and enjoying each and every bite!"


Contents of the Cookbook:

Foreword by Michael Cutler, MD

Introduction

Jillayne's Story
Michelle's Story
Convincing Reasons to Use this Book
Endorsements & Testimonials

Section 1: You Really Are What You Eat

Pottenger's Cats
Whole Food in a Nutshell
You Are What You Drink
Healthy Soil Makes Healthy People
Healthy Animals Make Healthy Food
Super Foods & Real Food "Supplements"
Why We're Not Vegans or Raw Foodists & What We Actually Are

Section 2: Treasured Traditions

Tips from the Garden of Eden
The Healthy & Happy Hunza
God's Recipe for Health
Traditional Food Preparation

Section 3: From Our Kitchens to Yours

Time Saving Tips
Becoming Ingredient Savvy
Our Favorite Kitchen Equipment
Our Least Favorite Kitchen Equipment: Microwaves
Food For Thought
Complete One-Year Food Storage List

Section 4: Treasured & Tasty Recipes

Recipes for Success
Sprouting for Dummies & Smarties (Sprouting Grains, Nuts & Seeds, Beans & Legumes)
Basic Dairy Recipes
Stocks & Broths Basics
Natural Sweeteners 101

Recipes for Taste
Drinks, Smoothies, & Popsicles
Breads (Traditional Basic Breads, Muffins & Sweet Breads)
Breakfast, Brunch, & Eggs
Salads & Dressings
Sandwiches & Wraps
Soups & Stocks
Vegetables & Side Dishes
Meatless Entrees
Meaty Main Dishes (Chicken, Turkey, & Fish, Beef & Lamb)
Spreads, Seasonings, & Snacks (Spreads, Sauces, Dips, & Marinades; Snacks & Crackers; Homemade Seasonings & Mixes)
Sweets & Treats (Frozen Desserts; Cookies & Bars; Pies; Cakes; Other Sweets; Frosting & Toppings)

Section 5: Last But Not Least

Weight & Measurement Equivalents
Recommended Products, Equipment, & Books
Notes
Recipe Index
About the Authors/Contact Us


Introduction

A growing number of people in this world suffer from illness in one way or another. We could go into great length describing these diseases one by one, but we won't. The list is far too long and depressing, and chances are you’re already well acquainted with the items on it. Maybe you or a loved one suffers from one of them.

We too have struggled with our own personal health challenges. But instead of becoming sour with the lemons of life, we made lemonade. It turned our really good too (since we used organic lemons; natural sweeteners; and pure, mineral-rich water to quench your thirst on a hot summer day), so we put it in the recipe section.

We started first by looking for nutritional truths because we felt there was an ideal diet for humans and that eating it would create health. It was harder to find truth than we thought. Everywhere we turned, we were confronted with conflicting information from low carb, low fat, low calorie, no grain, all raw, or vegan diets. Who was right? We felt first and foremost that what we would eat and drink should supply all needed nutrients to our bodies. Why else was food and drink created? But we also felt that food should be completely satisfying and taste good.

We devoted a lot of time to studying and pondering the correlation between diet and health. We did not gain this nutritional education from a formal institution where we could earn the right to display initials next to our names, because--in all honesty--what we discovered was not formally taught. Still, the education we received changed our lives. We developed a deeper understanding of nature’s nutritional guidelines and learned the forgotten food traditions of the world’s healthiest civilizations. What people have eaten and how they have prepared it has helped humans in many ages of time be free of diseases such as diabetes, autoimmune diseases, obesity, and many other problems. Their diets not only influenced their health--but to a large extent--determined it.

After applying these principles we learned to our own lives, we began feeling better, and our families got sick much less often. In fact, anything more than an occasional illness is virtually nonexistent in our homes. But what we didn’t expect was that applying these lost cooking techniques to our own meals would make them taste so wonderful. We love the way they smell, the way they make us feel--and most importantly--we love eating the meals we prepare this way because they’re so scrumptious!

We have compiled this recipe book in order to share the deliciousness of these priceless cooking techniques and to pass along what we have discovered about true nutrition. Plus, we thought it would be nice to have a recipe book on hand for every time we hear, “Ooh, this is so good. I have to get the recipe.”

The unique recipes in this cookbook are not only healthy, they actually taste better than most food available today. Compare your basic store-bought loaf and tub of margarine to the possibility of a hearty, steaming slice of sprouted, whole grain bread topped with a melting mound of freshly churned butter from pasture-fed cows. Or consider the pure pleasure of being able to enjoy ice cream made with fresh cream, real vanilla, and natural sugars that nourish the body and are gentler on blood sugar levels. When you eat fresh, wholesome food, prepared using the forgotten and tasty traditions of our ancient ancestors, your body and your taste buds will thank you. You really can have your cake and eat it too.

What are the forgotten and tasty traditions of our ancient ancestors? It’s no secret that a good diet was essential to their health and longevity. What did they eat, how did they prepare it, and how does this information affect the nutrition and flavor of the food we prepare today? How can applying this information help prevent disease and potentially reverse it?

We’d love to answer these questions right here in the introduction, but then it would be entirely too long, the whole organizational flow of the book would be hindered, and there would be no enticing incentive for you to read on. But rest assured, these questions will be answered in the remaining pages of this book.

So make a bowl of air-popped popcorn tossed with melted butter, coconut oil, and sea salt (the recipe for this is also in the recipe section), and sit back and discover why you can enjoy popcorn like this without feeling guilty.

Jillayne Clements

Michelle Stewart

Special Note: There are many sick or diseased people who have been healed by eating a certain way. We make no claim that preparing food in a traditional manner as outlined in this book will guarantee healing. We also understand that everyone is different, and that every body reacts differently to certain foods. The ideas in this book have worked well for our bodies, but modifications may be made to suite what works best for you.

The information in this book is not intended to diagnose, treat, or cure illness or disease and is not intended to be used as a replacement for proper medical attention. Consult your health care professional before changing your diet.

Warning: Although the sprouting process decreases the amount of gluten in grains, sprouted grain products still do contain gluten. Special care must be taken if you are celiac or gluten intolerant. Please consult your health care professional before trying any gluten containing recipes.

Tuesday, April 6, 2010

Raisin Cinnamon Bread Recipe


Raisin-Cinnamon Bread
(From The Diet Rebel's Cookbook)
Makes: 1 loaf / Prep time: 20 minutes / Raise time: 20 minutes / Bake time: 30 minutes

6 cups fresh sprouted spelt, kamut, or white wheat
½ teaspoon sea salt
1 ½ teaspoon baking soda
2 teaspoons cinnamon
½ cup “Roasted” almonds
¾ cup raisins

Blend fresh sprouts in food processor until they form a ball of dough. Add sea salt, soda, and cinnamon, and blend well. Pour in almonds while processor is still moving, to chop them. Mix raisins in by hand, or mix briefly with the processor. Shape dough into a loaf, and place on buttered cookie sheet, or put in buttered bread pan. Let rise for 20 minutes (optional) and then bake for 30 minutes at 350.

Carob or Chocolate Mousse Cheesecake Recipe


Carob or Chocolate Mousse Cheesecake
(From The Diet Rebel's Cookbook)
Makes: 1- 9" pie / Prep time: 45 minutes / Bake (crust): 15 minutes

Crust:
1/3 cup melted butter or coconut oil
1/3 cup carob powder or cocoa powder for Chocolate Mousse Cheesecake
1/3 cup dehydrated cane juice
2/3 cup sprouted wheat flour

Melt butter or oil in a large saucepan. Remove from heat and stir in carob or cocoa powder and sugar. Stir in flour and mix well until mixture becomes dark and crumbly. Press into a 9-inch pie pan and bake for 13-15 minutes at 350 degrees. When done, remove from heat and cool completely. In the mean time, prepare whipped cream topping to use as part of the filling.

Topping:
2 cups whipping cream
¼ cup liquid sweetener
½ teaspoon pure vanilla extract
shavings from organic dark chocolate bar to sprinkle on top of whipped cream

Whip the cream until thick. Stir in agave and vanilla. Use 1½ cups for the filling and save the rest for the top. Spread a layer of whipped cream along top of cheesecake. Fill a cake-decorating bag with remaining whipped cream and make designs around the outside edges of cheesecake. With a knife, shave a portion of chocolate bar for decorative sprinkles on top. Keep refrigerated.

Filling:
12 ounces cream cheese
2/3 cup dehydrated cane juice
2/3 cup carob or cocoa powder
1 teaspoon pure vanilla extract
1 ½ cups fluffy, already whipped cream

Blend cream cheese in mixer until smooth, then add the cane juice. Mix well. Add carob or cocoa powder a little at a time and blend well. Mix in vanilla and then fold in the whipped cream. Blend well and spread evenly into the cooled piecrust.

Note: The unique combination of roasted carob powder mixed with dehydrated cane juice creates a slight mocha flavor.

Berry Cherry Smoothie Recipe


Berry Cherry Smoothie
Makes: approx. 4 1/2 - 5 cups

3/4 cup frozen organic cherries
3/4 cup frozen organic blueberries or other berries of choice
2-3 cups fresh milk (from certified healthy, pasture-fed animals)
1/4 cup agave or grade B maple syrup
1/3 cup plain yogurt (with live, active cultures)
1/2 tsp pure vanilla

Place all ingredients in a blender and blend until smooth.

Fruit and Almond Cluster Granola Recipe


Fruit and Almond Cluster Granola
Makes: approx. 10 cups / Prep time: 35 minutes / Dehydration time: 12 hours

5 1/2 cups almond flour (dehydrated pulp leftover from almond milk, run briefly through a food processor to make it like course flour)
1 cup maple syrup
2 apples, sliced thin
2 pears, sliced thin
3 bananas, thinly sliced
2 mangos, peeled and thinly sliced
½ -1 pineapple, sliced thin
½ cup raisins
½ cup dried cranberries
½ cup raw sunflower seeds
½ cup raw pumpkin seeds
¼ cup raw flax seed
2 cups graham crackers, crumbled (optional, see recipe)

Slice all fruit thin then lay out on dehydrator trays. Dehydrate for 12-14 hours at 115.

To make almond clusters, stir together the almond flour with the maple syrup until it is just damp and sticks together. It should be fairly dry. Place on a food dehydrator solid sheet and dehydrate for about 12-14 hours at 115 degrees. When done, crumble into a bowl and add dehydrated fruit and seeds. Serve with raw milk and fresh fruit.

Vegetable Alfredo Pizza Recipe


Vegetable Alfredo Pizza (From The Diet Rebel's Cookbook)
Makes 1 large pizza / Prep time: 50 minutes / Bake time: 14 minutes

Sourdough Crust:
2 ½ cups freshly ground, non-sprouted spelt/kamut flour
¾ cup water, enough to make a stiff ball of dough
1½ teaspoons apple cider vinegar, whey, or fresh squeezed lemon juice
½ teaspoon sea salt
1 teaspoon baking soda
1 tablespoon olive oil
cornmeal for sprinkling on pizza pan

Sauce:
4 tablespoons butter, melted
4 ounces cream cheese
2 tablespoons milk
2 cloves garlic, minced
2 teaspoons parsley

Toppings:
1 14 ounce can artichoke hearts, drained and chopped
5-6 medium mushrooms, sliced
1/3 red onion, quartered and sliced thin
1 cup fresh spinach, washed and torn
1 medium zucchini, sliced thin like pepperoni
1-2 tomatoes, chopped
1 bell pepper, chopped (optional)
1 cup sliced olives
1½ -2 cups raw cheese

For the crust, stir together water and vinegar, whey, or lemon juice. Mix with flour in a glass bowl until it forms a very stiff ball of dough that just picks up all the flour. Cover bowl with a damp cloth and leave in a warm place for 12-24 hours. The dough should have bubbles and be about doubled in size after this time. Add remaining ingredients and kneed them into the dough for about 5 minutes. Roll onto an oiled surface, and transfer to pizza pan dusted with cornmeal, stretching the dough as you go to reach the edges of the pan. Bake for 8 minutes at 425 before adding toppings.

For the sauce, melt butter and cream cheese in a pan. Mix well. Add milk, garlic, and parsley, and stir with a fork. Spread onto pre-baked pizza crust, then top with prepared vegetables. Bake for 13 minutes at 425, remove from oven and sprinkle cheese over top. Stick back into the oven for a minute or two to allow cheese to melt.

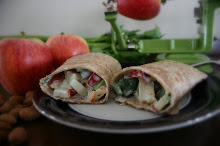
Apple Almond Wrap

Almond-Apple Wrap
Serves: 6 / Prep time: 20 minutes

2 apples, diced
4 stalks celery and leaves, finely diced
1 can olives, drained and chopped- optional
1 green bell pepper, seeded and diced
½ cup soaked almonds, chopped
½ cup fresh spinach, finely shredded
¼ of a medium red onion, diced
1/3 cup mayonnaise (I use Vegenaise made with grape seed oil)
¼ teaspoon sea salt
sprouted wheat bread or sprouted wheat tortillas

In a bowl, mix remaining ingredients. Add Vegenaise and mix well. Spoon into tortilla shells.

Caramel Apple Crisp Recipe

Caramel Apple Crisp -
Prep time: 20 minutes /Bake time: 40 minutes at 350 /Makes: 9x13 pan

Ingredients:

•7-8 medium apples cored and sliced (keep skins on if you can, Fugi and Gala work well for this.)
•1/4 cup agave (a liquid, low glycemic, natural sweetener available in most health food stores)
•1/2 tsp cinnamon
•2 Tbsp sprouted wheat flour

Directions:

Place sliced apples in a bowl. Stir in agave, cinnamon, and sprouted flour. Pour into the bottom of a 9x13 pan. Set aside.

Crust:
Ingredients:


•1 cup sprouted wheat flour (sprouting wheat partially digests gluten and starch, increases nutrients and digestibility, and creates a lighter texture*.)
•1 cup chopped almonds (soaked and dehydrated almonds taste best**.)
•1/2 teaspoon cinnamon
•1/2 cup dehydrated cane juice (natural sweetener containing micro-nutrients with a slight molasses flavor. Brand names include Rapadura and SuCaNat.)
•1/2 cup butter (melted)

Directions:

In a bowl, stir together sprouted flour, chopped almonds, cinnamon, and cane juice. Pour in melted butter and mix until crumbly. Sprinkle over the top of apples and bake for 40 minutes at 350 degrees. While cooking, prepare caramel and whipped cream.

Caramel Topping:
Ingredients:


•1/4 cup butter
•1/4 cup pure maple syrup (natural maple syrup with micro-nutrients)
•1/4 cup agave
•1/2 cup dehydrated cane juice

Directions:

Pour ingredients into a sauce pan and turn to medium low heat. Stir occasionally until dehydrated cane juice has completely dissolved. Bring to a boil then remove from heat. Drizzle 1/2 - 3/4 cup over apple crisp when it is done baking.

Whipped Cream:
Ingredients:


•2 cups heavy whipping cream
•1/4 cup agave or pure maple syrup
•1/2 teaspoon vanilla

Directions:
Whip cream until soft peaks form. Mix in agave and vanilla. Serve over top of apple crisp.

** Soaking almonds neutralizes enzyme inhibitors and increases nutrients, nutrient availability, and digestion. Soak 2 cups almonds in filtered water with 1/4 teaspoon of sea salt for 8-12 hours. Rinse and dehydrate for 24 hours at 145 degrees. Soaking expands the almonds and dehydrating them leaves them crisp and hollow so they pop in your mouth.

All natural sweeteners may be purchased at most health food stores.

See how to make this recipe on YouTube.

Pistachio Ice Cream Recipe


Homemade Pistachio Ice Cream
Makes about 5 1/2 cups

Ingredients:

2 cups whipping cream (from healthy pasture fed cows)
2 egg yolks (yolks from healthy free range, bug eating hens. Yolks should be orange. Also, wash eggs thoroughly before separating.)
1/3 cup agave
1/2 tsp pure vanilla
1/2 tsp almond extract
1/2 cup chopped organic pistachios (without the shells or it would be way too crunchy)
1/4 tsp liquid chlorophyll (this is for a green-ish hue and added nutrients, but is optional)

Directions for ice cream maker:

Mix egg yolks in with whipping cream, then add agave, vanilla, liquid chlorophyll, and pistachios. Place in an ice cream maker and make according to directions.

Directions if you don't have an ice cream maker: (Or if the one you have is from 1932 and uses a hand crank so no one wants to crank it, and your arm muscles are buff enough from doing other things so you feel you don't need the extra exertion.)

Pour whipping cream into a mixer (like Kitchen Aide with the whipper attachment) and add egg yolks. Whip on medium until it thickens slightly. Then add agave, vanilla, almond extract, and chlorophyll, and whip more until the mixture is a little thicker but can still barely pour. (You really want to get it to the consistency between being able to pour and having to scoop it out of the bowl.)

Remove bowl from mixer and stir in pistachios. Pour into a 5 lb tub or other freezer safe container. Cover and set in freezer. Depending on how cold your freezer is, stir every 30 minutes to an hour until set. (My freezer takes about 2 hours, but maybe that's just because the little knobby that controls the temperature bounces back from what I'm trying to tell it to do, so my freezer is especially cold.)

Directions for eating: Get a bowl and a spoon and eat. Or just a spoon and the open container. Just don't tell anyone. :)

How to Sprout Grain


Sprouting grain really is simple once you get the hang of it.


Step 1. Fill a glass bowl with wheat, spelt, or kamut and cover with filtered water. Let it sit for 8-10 hours.


Step 2. Dump it into a stainless steel colander, cover with a damp cloth, and set in a warm place.


Step 3. Rinse once a day, and in a day or two, you should see cute, little tails growing.


How simple is that? Once you get the hang of it, you can make large batches at a time. The sprouted grain can then be dehydrated for preservation, and then run through your wheat grinder to use in place of other flours in your cooking as needed.

Introduction

Growing up, I heard the phrase, "You are what you eat." I never gave it much thought, though. I probably would have just avoided Dum Dums, Ding Dongs, and suckers, and stuck to Smarties and Angel Food cakes instead, all while hoping to meet a Big Hunk someday. (I did, by the way. I even married him.)

It wasn't until my health crashed in my early thirties that I realized how true the statement was. I had eaten a lot of junk, and that is exactly how I felt. I was tired and grouchy all the time, I had a lot of the symptoms of diabetes, and I had a yellow/orange hue to my skin that had me looking like a tanning lotion application gone wrong.

Eventually, I found that I had hypothyroidism, anemia, blood sugar stabilization problems, hormone imbalances, and gluten, starch, and other food intolerances. At first, I felt very sorry for myself and cried a lot. In fact, I thought I was pregnant because I cried so much, even at the end of Mulan when her dad said she had honored him by saving China. (Sorry to those of you who haven't seen the end and I just blew it.) But I wasn't pregnant, and there would be no joy of holding a new little one in my arms after months of pregnant-like symptoms.

Then I decided to take action. I was going to feel better even if it killed me, and I knew that improving my diet was the first place to start. I delved into understanding how people have eaten for generations on this planet, a time before food was refined and processed, a time where civilizations lived completely off the land, and a time before diseases like hypothyroidism, cancer, diabetes, heart disease, autoimmune disease, and obesity existed. I discovered that our ancient ancestors were remarkably healthy, living for years longer than we do now, and didn't have these diseases. What they ate and how they prepared it determined their health, and I could apply this knowledge to my own cooking.

So I started having fun making healthy, whole foods based on these principles and found that my body could easily digest and assimilate them, even gluten containing foods because I applied the lost preparation techniques. I wasn't surprised that my health improved, but I was surprised that cooking this way made the food taste so awesome.

I couldn't keep these secrets to myself, so I began sharing my creations. The next thing I knew, I was teaching classes about true nutrition, selling my desserts, making a tasty berry cream pie on live TV, catering, and writing and compiling this cookbook with the culinary talents of Michelle Stewart, whose own health story, beliefs, and cooking experiences are quite similar to mine.

This cookbook is made of more than 300 delicious recipes based on the forgotten food preparation techniques. Not only do the recipes taste wonderful, but they are easier to digest, help stabilize blood sugars, teach how to eat wheat when gluten intolerant, and how to properly use grains, beans, and nuts so you can increase nutrients and decrease gas. But most of all, you really are what you eat, and using this cookbook can make it wonderful.

Wednesday, March 31, 2010

The Diet Rebel's Cookbook: Eating Clean and Green


I am so excited! Michelle Stewart (my co-author)and I have been getting our cookbook ready to go to print, because it will be out in April. Today, it's difficult for me to think about anything else but recipes and the words that create them, because we've been going over the proof, so I'll just blog about it.

Michelle and I discovered how very much quality of food impacts health. (We found this out the hard way, after losing health for a time, then regaining it through proper food and lifestyle choices.) This information was gathered from dietary studies of the world’s healthiest and disease-resistant cultures throughout history. We wanted to know what they ate that contributed to their health, and as a result, we learned the cooking techniques they used to increase nutrition and create healthier bodies—information that is lost to us today—and quite by accident discovered that preparing food this way made it taste amazing.

"What are the forgotten and tasty traditions of our ancient ancestors? It’s no secret that a good diet was essential to their health and longevity. What did they eat, how did they prepare it, and how does this information affect the nutrition and flavor of the food we prepare today? How can applying this information help prevent disease and potentially reverse it?” - from The Diet Rebel's Cookbook

I would love to answer these questions right here and now, but for the sake of time and space on this blog, you'll have to read the book to find out the answers to these questions. :0) But don't worry, it will be out in April, and I'm looking forward to getting my recipes out of a cookbook instead of my four inch stack of recipes, where whatever it is I'm looking for is ALWAYS on the bottom.